Showing posts with label inspiration. Show all posts

Sunday, October 10, 2010

Echo Park Inspiration by Paula Perry

Paula loved these papers from Echo Park, and had this to say
Echo Park Papers the colours are brilliant, very colourful without being overly bright! I found them very easy to match with photos as there is such a lovely mix of colours. Love the alphabet sticker sheet too...those tiny alpha's are so hot right now & it's fantastic to have a choice of colours. I've actually used the 'life is good' label as a sticker on my page.
Materials used with FOREVER ALWAYS ONLINE STORE click and shop Links


Sunday, June 20, 2010

Tattered Angels inspiration by Paula Perry

I'm a huge fan of anything 'Tattered Angels' & couldn't wait to have a play with their Tailored Tags.

With 'Daddy's Girl', I simply sprayed with glimmer mist & used behind the photo. The shimmer on the tag is gorgeous!

Bazzil cardstock; Pink Paislee paper; Tattered Angels tailored tags & glimmer mist; doily; Heidi Swapp stamp; Fancy Pants stamp; Technique Tuesday stamp; Scenic Route alpha's; 7Gypsies stickers; ribbon; date stamp.

For my 'Memories' layout, the corner of the tag was already cut out...I simply continued the cutting. I embossed the heading in silver & then glimmer misted over the top, blending the two colours together.

Bazzil cardstock; Crate paper; Bella lace paper & flowers; Tattered Angels tailored tags, glimmer mist & glimmer screens; MM crystal brads; Heidi Swapp stamp; silver embossing powder; Kaisercraft stamp, pearls & bling; tissue paper.


Monday, September 17, 2007

BasicGrey Inspiration - CHA new releases + NEWS

With the arrival of the latest Released ranges from BasicGrey, the girls have been busy creating to inspire us all, you can view this inspiration in PDF newsletter form, by going HERE to download and print.

Some News -
THURSDAY - SCRAP & CHAT STUDIO TIME
10.30-2.30 - bring your packed lunch, we are scrapping, please book space is limited. This is FREE studio time, tea and coffee supplied ~occasionally something freshly baked :)
Retreat #7 - was fantastic....with travelers from 3 states, we had our biggest scrap table ever...with lots of food, fun and laughter....those singstar moments were recorded, with the cooks scrapping pages for their favourites. These pages and photos of all the shenanigans can be seen in the Gallery.
Monthly Sketch Challenge:- as we are almost half way through the month its time for a reminder you gotta be in it to win it!
Don't forget if you want to have a Designer Page done for you. Enter our Guest Designers Sketch Challenge and Deirdre Heath could be scrapping your photos!
September Cybercrop - 21st September, time to circle the date on your calendar, organise the takeaway and book the hubby into babysit the kids, while you take the night off to scrap. Use the Hyperlink to the FORUM to register which is the first step in winning a prize, this month we have a random draw for those that register prior to the event, and for every challenge you enter your name goes in the pot, to win a $15 shopping spree on Forever Always . With a fantastic order of events lined up over two days
Friday
7:30pm Kids Challenge (No adults allowed!)
7:40pm Challenge 1
8:00pm Challenge 2
8:20pm Bingo (Played in the Bingo thread)
9:00pm Challenge 3
Saturdays
10am – Saturday’s Bonus
8pm - 10pm – Amies Progressive challenge run live

and an extended upload date till the end of the month, its just Register, Commit, Complete its that easy!!! And how about an early hint - "what's cooking in the kitchen.......inspiration."

We said action packed, and that's just the beginning.....loads of fun, great prizes, laughter and friendships....we hope to see you there.

And its here at last the launch of our biggest event on the net
Can you be the last scrapper standing and win a spot on our Design Team. All details will be found here.

www.foreveralways.com.au

Studio - Online Store - Forum - Gallery - FA News Blog - Retreats & More

Friday, August 17, 2007

Fathers Day Inspiration, What's New &More


Fathers Day Inspiration & More

The girls have busy inspiring us all, you can view this inspiration in PDF newsletter form, by going HERE to download and print.


here is a snippet of what you will see
BasicGrey NEW Ranges are in and shipping out already.
KaiserCRAFT Rubons are going up....so lots of whats new in the shop....be sure to pop over and check it out.
We have an action packed month this month girls, so just a few reminders.

Retreat #7 - 6th 7th 8th & 9th September 2007, last chance only 3 spots left in the dorms all numbers are closed off TODAY.Book now its not too late to join the girls for some fun! Also our Monthly Sketch Challenge as we are almost half way thru the month its time for a reminder you gotta be in it to win it! Don't forget if you want to have a Designer Page done for you. Enter our Guest Designers Sketch Challenge and Debbie Benefield could be scrapping your photos! August Cybercrop - 24th August, time to circle the date on your calendar, organise the takeaway and book the hubby into babysit the kids, while you take the night off to scrap. Use the Hyperlink to the FORUM to register which is the first step in winning a prize, this month we have a random draw for those that register prior to the event, and for every challenge you enter your name goes in the pot, to win a $15 shopping spree on Forever Always . With a fantastic order of events lined up over two days
Friday
7:30pm Kids Challenge (No adults allowed!) 7:40pm Challenge 1 8:00pm Challenge 2 8:20pm Bingo (Played in the Bingo thread) 9:00pm Challenge 3
Saturdays
10am – Saturday’s Bonus
8pm - 10pm – Amies Progressive challenge run live

and an extended upload date till the end of the month, its just Register, Commit, Complete its that easy!!! And how about an early hint - "shaken not stirred.......inspiration."

We said action packed, and thats just the begining.....loads of fun, great prizes, laughter and freindships....we hope to see you there.

With only a Month to go to the launch of OUR biggest event on the Net, what better time to start joining in on the fun.
Studio - Online Store - Forum - Gallery - FA News Blog - Retreats & More


Retreat 7 September 2007 - Its almost here


todays the last chance to reserve your spot - 3 spots left!!!!!


Retreat 8, 9, 10 are now open for bookings, call to enquireMY BLOG

Friday, August 03, 2007

WE have a GUEST JACKER on our DT

Yes that is our very own Louise Nelson, Lucky girl that she is, fantastic talented woman, who nominated this months jack over on the Aussie ScrapJacked Site.

Louise had this to say
"I started scrapping approximately 2 years ago when a work colleague bought a holiday album to work. From there I was invited to attend her home and scrap for the day with a group of her friends. She also lent me all of her scrap magazines, which I devoured. From this time on I was completely 'SCRAPTIVATED' ~ lol.
Scrapping has been mostly a creative outlet for me, as I dont have any family of my own, and unfortunately very few personal photos. I have been known to beg, borrow and steal the photos of my friends, and friends that I have met on-line, to scrap.

Recently I was priviledged to be asked to join the Design Team at 'Forever Always'. This has been a FABULOUS experience, they are an amazing 'family' of like minded creative individuals.
I consider my style to be simple, and a combination of elegant and freestyle.

Thank you to the team at Scrapjack for this wonderful opportunity, Keep up the Fabulous Work!!!!!

We also happen to be sponsors this month....so be sure to get over and have a go at Aussie Scrapjacked Jack
And check out this wonderful Jack....go louise go!!!!

Monday, July 16, 2007

Ribbons & Flowers Inspiration

Ribbon & Flowers inspiration

When I need to add that something “extra” to a layout that is lacking, the first thing I reach for is my ribbon and flower stash. They are an effective way to add colour, texture and dimension to a layout, quickly and easily! They can be girly, bold, sheer, colourful, or elegant, funky, sweet or just the perfect addition to that masculine page as well. The most versatile of embellishments, they come in an infinite number of colours, sizes and designs, which means you’re bound to find the perfect one for your next project. Use them to create a subtle accent or add that extra elegance. Just check out the DT work below, for some awesome inspiration.
Tips & Techniques
How to deal with fraying Ribbon? Trimming the ends of the ribbon tails at an angle will keep the ribbon from fraying. You can simply cut the end of the tail at a straight angle, or cut an inverted “V” into the end for a sophisticated look.
Ribbon to wide for that hole? Try making your own threader with a thin piece of wire, bend it in half insert it through the hole backwards, thread the ribbon through the wire loop, and then pull the wire back through the hole with your ribbon with it.
How to print on ribbon!

  1. Print words onto scrap cardstock. You need the heavier weight of cardstock to support the ribbon. (I prefer to have my printer set to landscape so that the ribbon is running in and out of the printer – not across the page.)
  2. Use double sided tape to adhere ribbon, directly over the top of the words you printed on the cardstock. Only tape around the edges.
  3. Feed the cardstock back thru the printer in the same way again. The words will print in exactly the same place on the sheet, which means you have printed on your ribbon.
  4. Carefully peel the ribbon off the cardstock. If you peel carefully the tape will stick to the cardstock not the ribbon. You can then discard the cardstock scrap.
  5. Use your ribbon word strips, as borders, tags, or even as journaling.
by Paula Perry
When Sonia said that this month’s inspiration was to be on ribbon & flowers, I could not have been happier...I love them both. They are such an easy way to add colour & dimension to a page from a hint to the full on array. They come in such a variety of colours, patterns, & sizes that they can suit any layout. Ribbons can be attached in various forms like staples, brads, & glue but I use 6mm 'Xpress it' double sided tape, though with the Queen & Co. red felt I used 'Xyron' adhesive runner.

'Essence of U' - Bazzill cardstock; Pink Retro Series 1; FTI mini stitched ribbon in ruby, cerise, dusty pink & lavender; FTI stitched 10mm in ruby & lavender; Heidi Swapp - sweet ribbon, clear corners love stamp, white paint; Autumn Leaves journaling stamps; Stampin Up markers; MM beach red rubons; dimensional magic.


'Perfect Girl' - Bazzill cardstock; Autumn Leaves flourishes clear stamps; Bubble Gum VersaCraft ink; Petaloo lge daisy flowers; Queen & Co. Fab flowers kissy fit; MM bling brads; FTI Ric Rac white & pink flowers; Heidi Swapp fuzzy rubons; flower centres created with chipboard painted with HS pink & dimensional magic.


'Bloom' - I was one of those admiring this felt ribbon at the retreat...very excited to use it...wanted to keep it simple to not take away from this gorgeous stuff! - Bazzill cardstock; Queen & Co felt red ribbon; Basic Grey mini monograms painted red with American Crafts rubons & dimensional magic; Stampin Up stamps; black brad.


by Michelle Winston
Ribbon and Flowers...what to do with them? There are many creative ways to use ribbon and flowers, and here's just a few. Use them to frame a picture, as I have in my ‘J_Dreams’ LO. For extra pizzazz, I also machine stitched around the ribbon edge. You can also use ribbon and flowers to make things look pretty...my ‘gift bucket’ looks bright and funky, courtesy of the many pieces of ribbon tied to its handle, and its matching blooms on the front!
‘J_Dreams’:- Bazzill; Chatterbox Decorative Ribbon – Chocolate; Petaloo Flowers; Lil Davis Chipboard Alpha; Machine Stitching
‘Gift Bucket’:- Small Metal Bucket ($2 shop); Assorted Ribbon - FTI Ribbon Braid, FTI grosgrain & Mini Stitched grosgrain; Paint, Sandpaper; Paper Flowers, Bazzill Bitty Blossom, Brad


by Gab C
Here are a couple layouts from a while back but they fit this topic so well. ‘songs of my heart’ shows that Jenni Bowlins Rub-ons work really well on to the ribbon. ‘2 cute’ shows the versatility of ribbon as a background – strips of different patterned ribbons form a striped space, and by using the Queen & Co white flower as a template Gab has kept to the same shade of red when hand cutting the flower.


by Amie Taylor
Flowers and Ribbon...... How lucky are we this month!! I love using flowers and ribbon and normally have at least one or both on all my LO's I do. I find the easiest way to attach ribbon is using staples or double-sided tape. Staples are definitely the quickest way. You can do so much with ribbon, I am always checking out new ways to use ribbon in magazines and on blogs I read.

‘Kiss’- Bazzill Cardstock, FTI Flowers, Scenic Route Paper Co (Berkley alpha stickers), Finishing Touch Ideas 6mm Braid ribbon hot pink/lime & hot black/white, I have hand cut the Arrow and then painted with francheville paints.

‘even girls love playing in Mud’ – Crate Paper (Crush Crate Ribbon) – attached by using double sided tape, FTI flowers, Bazzill Cardstock, Doodling in lead pencil.


‘isn't she Beautiful’ - BG Infuse PP Salt, Stew & Concentrate, BG Infuse alpha stickers, Queen & Co Felt Flower Ribbon, Fancy Pants Designs (Dapper Flower Jar), HS Kiwi Flower, Crate Crush Ribbon, FTI Brads, Grey Felt, Red Button

‘sisters!’ - This is a very simple easy LO using flowers and ribbon, I have attached the felt ribbon with brads, I have only used four as I only had four of this colour left but you could use as many as you wanted..... I have attached the ric rac and flowers with a staple and threaded the black ribbon underneath the staple and tied it in a bow. Very very easy and simple. - Pink Bazzill Bling, Scenic Route Paper Co (Alpha Stickers), FTI Flowers, FTI Floral ric rac, Queen & Co Felt Ribbon, Brads.
How beautiful is this Queen and Co felt ribbon!!, I just loved it as soon as I open my DT Pack.... I couldn't wait to use it!! It is very easy to use and just looks gorgeous on any page. I found it very easy to attach using the brads and on my other LO I actually used double sided tape and a piece of grey felt stapled on and a button covering the staple. I am definitely going to invest in some more colours : o)


by Kylene Hickey
"Ribbons and flowers are right up there on the top of my list of "must haves" in my scrapbooking supplies. I love their versatility and the wide variety of colours, textures and designs available. It is probably pretty hard to find a layout of mine that doesn't have at least one of these items. Flowers -Stamp them, stitch them, cut them, punch them, dye them, buy them, make them, and draw them. Whatever way you like, you've just gotta have them. And yes, they can be used on boy layouts too!!"
‘My Brother’- Kraft cardstock, Li'l Davis Designs chipboard alpha, Crate paper ribbon, Fancy Pants flowers, Jenni Bowlin Studios rub-on, Other - silver brads / staple / embroidery thread. For this layout I have used the ribbon to make a border for journaling tag which is hidden behind the photo. The flowers have been attached using brads. (Completed 7/07/)

‘My Precious Girl’ - Bazzill cardstock, s.e.i patterned paper, Queen & Co chipboard alpha covered in Kelly Panacci papers, Ribbon, Foam mounting tape. I have cut the flowers from patterned paper and layered using foam mounting tape to add dimension. The ribbon has been used to frame photo. (Completed 7/07)
‘Altered item -ribbons case’ - I bought this suit case from local discount store for $1 and very easily altered by painting, and embellished with ribbon, flowers and painted Queen & Co chipboard alphabet. Too easy!!


by Guest Designer Debbie Benefield
When Sonia asked me to be a Guest Designer I was both excited and terrified, until she told me the theme of flowers and ribbons - "aaaaaah, now that I can do!"
My 1st layout ‘ME?’ was inspired by a LO I saw quite awhile ago that just stuck in my memory, This is a great way to utilise your ribbon stash. Products used: Bazzill c/s, various ribbons including the gorgeous Crate Baby bee collection, brads, and Delish bikkies chipboard letters coloured with ink/chalks and dimensional magic to top them off.
I loved the Crate Baby Bee ribbon collection and just had to use them in a ‘cute Baby boy card’, so easy to do. Products used - Bazzill, Crate Baby Bee ribbon collection and buttons. On my 3rd item ‘every little girl


deserves a castle of her own’, I was inspired by Louise's lesson on how to add a painted border last newsletter, I just had to try it out. I chose to keep the chipboard flowers raw to tie in the cardboard castle feel. Products used - Bazzill, making memories chipboard flowers, prima flowers, various making memories brads including retreat # favourite product (we all had to have them) polo buttons, Cosmo letters. Thank Sonia for such an amazing opportunity.

by Louise Nelson
'I am Easy to Love' - For this Layout I used the eyelets and ribbon to allow me to make a highlight fixing of the photo at each corner. I then cut out some of the flowers from the Queen & Co. felt border to embellish around the edge of the photo, which I fixed in place with brads. Products used - Doodle Bugs embossed cardstock, Queen & Co. felt floral border, Brads, Eyelets, Ribbon, American Crafts thickers – letters, Rub-ons and Machine stitching.

'Just Beautiful' - For this Layout I cut out some of the flowers from the Queen & Co felt border to highlight the edge of the photo and then used a contrasting rub-on on another border of the photo. Products used - Basic Grey patterned cardstock from the Gypsy range, Basic Grey Wholly Cow rub-on, Queen & Co. Felt border, Senic Route Co. Chipboard Letters, Folk Art Paint, Brads, Zig memory pen, Machine stitching

‘Photo CD Album’ - I figure we go to a lot of trouble scrapping our photos but not so much the CD's that we store our photos on. Whilst not overly practical, it is a lovely way of storing them, or you could perhaps use this idea as a gift when giving away copies of photos, as families do, when they share photos of special occasions. It is a little different to the pre-manufactured plastic and cardboard CD files and boxes that you can purchase. Products used - Doodle Bug patterned papers, Bazzill Pizazzil patterned cardstock, Hambly Studio's overlays, Flowers – Petaloo, Ribbons - assorted ~ all from the Forever Always on-line store, Jewel - Doodle Bugs.
by Guest Designer Fran Tynan

‘You mean stuff to me’ a Lo of Darcy and me. I love this photo as I'm rarely in a photo but didn't even know this one was being taken. It's not overly ribbony or flowery but more an example of how the ribbon and flowers can be the sole feature of the page. Products used Crate Paper Zoom Collection ribbon, Petaloo flower, and Finishing Touch Ideas chipboard alpha.
'sing star'- again not over the top flowery or ribbony - but "ME"!! The Crate paper ribbon gives a frame for the photos to stand out more on the page and the flowers add the girly touch, while still matching the natural type colours. Products Used Crate Paper Zoom Collection ribbon, Fancy Pants Designs Dapper Flower Jar,
- also check out these cards that fran has created…..so quick and clever!!!


How to use ribbon on a LO
  • Tie onto a tag, photo mat, border, or photo as an accent.
  • Use with a hole punch to make a fancy border.
  • Tie onto clips attached to paper.
  • Use as a tie up lock on hidden journaling.
  • Staple along the edge of a photo for a border.
  • Frame a photo, by attaching as a border around a photo.
  • Tie in a knot and adhere with a glue dot.
  • Attach a ribbon charm and use as a long border.
  • Thread through eyelets and tie as an accent.
  • Tie onto a slide holder for a small picture frame.
  • Create your own patterned paper by using ribbons as stripes
  • Tie onto each end of a metal label holder.
  • Tie small bits of ribbon onto a larger piece of ribbon for a unique border.
  • Attach diagonally along the corner(s) of a photo.
  • Stamp words and sayings onto ribbons for titles.
  • Make shapes with it – draw a star, then punch holes at the points and use thin ribbon to thread through.
  • Place ribbon in a heart or circle shape to form a frame then stitch in place.
How to use flowers on a LO
  • Make your own using punches, sizzix or hand cutting them out, from chipboard, foam, felt, transparency, ribbon or even fabric.
  • Simply attach with a little bit of tape, or use a brad thru the centre.
  • Stitch them on with a button centre.
  • Want to make your blooms a little more personal, add some ink, chalk or even rub-on words directly to them.
  • Try layering flowers of different sizes.
  • Fold them in half to create borders.
  • Create them using stamps, stitching, or masks.
  • Layer flowers and foam tape to create a 3d effect.
  • Use with chipboard shapes as centres eg. Smaller flowers / hearts
  • Experiment with combinations of flowers eg. Felt, paper and silk on the same LO
  • Use the petals to create other embellishments - butterfly and dragonfly wings / fish tails
  • Use other shapes to make a flower - hearts, circles, paisley designs

And if you fancy a bit of a swap – why not pop over to our forum, we are just unleashing a flowers and ribbon swap. See forum for details..

Friday, June 15, 2007

Circle Inspiration

Circle Inspiration
There was a time when I would never have considered a circle photo, then I went thru a faze of creating them all the time…then it was oh no don’t cut your photo’s into circles, but if you look around Circles are everywhere again!
They are back with a vengeance….and why not!!!

The circle is one of the best shapes and is part of the geometric group of shapes that form the basic elements of design. Circles can add interest to a design, they help to organize and separate elements and they can also help to direct the eye through your layout.

There are many tools and products available to help your create your circle shapes…but never go past the dinner plate for a great round shape. Circle punches are also great, not because of the obvious use but also for using as a template to create your own scalloped edges/borders. Don’t forget the popular polka dot papers that are all very popular at the moment…Jenni Bowlin has some great ones…

When considering using circles on your page consider, the mood of your layout, circles create a mood that is fun, energetic and playful. This means circle style elements work well with pages about bathtime…think of those bubbles. Other suggestions would be for title like circle of friends, or circle journals…Wedding pages…with this ring!!! Just to name a few…

Working with circles is fun, don’t be scared…here are a few techniques and suggestions, that could help you to create some perfect pages by adding a circle or two!
  • Tear your paper into a circular design
  • Stamp your own polka dot background using acrylic paint and a wine bottle cork
  • Save the lid from a can and use it as a photo frame
  • Use a dinner plate to trace a circle and challenge yourself to work within the circle only.
  • Use a coaster as a page element
  • Use a old cd as a page element or even as a template for adding circles with brads or eyelets!
The Design Team girls, were given the challenge of circles, this month, lets hope something here inspires you to go forth and create circles….
by Paula Perry
I have loved circles since my introduction to scrapbooking in my CM days...but don't use them to the same extent! My 'Summer Fun' layout was inspired by an Ali Edwards layout in CK, it was fun to revisit the circular photo! In 'Biker Babe' I had a bit of a play around - again I had a memory of a layout that I had previously seen. I love that the circles add a softer feel to a layout; they can add a sense of movement & flow. I just love the effect that circles have on a layout.

'Biker babe' - Bazzill cardstock; My Minds Eye wild asparagus - 'so pretty' dots/light pink; HS ghost letters; FTI pearl brads medium; MM beach rubons; Stampin Up stamps.
'Summer Fun' - cardstock; SEI paper; American Craft -Accents BK1, Ned Jr; Queen & Co go green round brads; Signo white pen.
'Dimples' - Bazzill cardstock; BG Oh Baby!Boy - jackson, peapod, letters; Heidi Swapp polo ribbon; Queen & Co boy crazy hook ups.
By Kylene Hickey
When I first heard that this month's focus was on circles, it got me thinking about all the different ways we can incorporate circles on our layouts. Sometimes bold, sometimes subtle - from patterned papers, to chipboard embellishments, from stamping to stitching, we can cut from papers and cardstocks, overlapping and intertwining, big, small, the possibilities are endless. Unfortunately my hands could not keep up with the creative mind, so I have stored all of these ideas away for future use.

Possible titles and journaling ideas -

"The Circle of Life"

"Some days I just feel like I am going round in circles"

"What goes around, comes around"

"You spin me right round baby"

Quote -

"Our family is a circle of strength and love.
With every birth and every union
the circle grows.
Every joy shared adds more love.
Every crisis faced together makes the circle stronger."
Let's see what you can come up with!!!

"Growing Up" - Patterned papers - Crate Paper Baby Bee collection, Heidi Swapp Chipboard alphabet, Cherry Arte Chipboard embellishment, Carolees Creations rub-on's, stranded embroidery thread. I have hand stitched stars to form a circle frame.
“Hickey Family” - Bazzill cardstock, Heidi Swapp Ghost Letters, Scenic Route Paper Co chipboard alphabet, Junkitz buttonz, Other - ribbons / ink / embroidery thread "She Said What?" - Kraft cardstock, Papers - Sei / Cosmo Cricket, Heidi Swapp Chipboard alphabet and Credit Card Punctuations, Jenni Bowlin Studio Rub-on's, Other - flowers and hand stitching
By amie Taylor
I loVed everything about the DT pack, from the colours, gemstone brads, Jenni Bowlin Studio Rubons we got to work with to the Heidi Swapp Ribbon - that I used way too quickly I loved it that much :0)
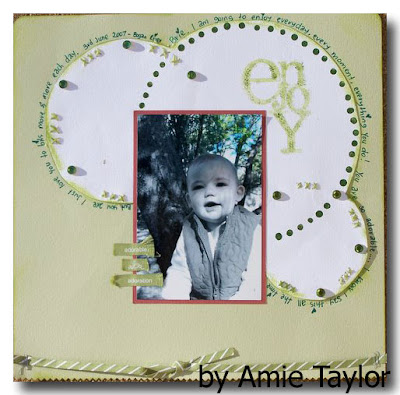
Focusing on circles was hard, I liked how my 'Enjoy' LO came out, though the photo doesn't show up the Gemstone brads, but they really do look good outlining the circles. The other 2 LO's just came together easily using the brads as the focus on circles.

'Enjoy'- Bazzill cardstock, Stitching, HS ribbon - sweet pea horizontal & adore, HS Acrylic Stamp Enjoy, francheville green paint & green journaling pen.
'Enjoy the natural Bond' - HS Ribbon, polka-dot & Adore, HS Credit Card Flowers, Jenni Bowlin Studio's Rubons, Blossoms, white journaling pen, pp Coco - Wireblooms & Queen&Co stylish brads alphabets & Lil' Davis Chipboard letters Glitter Pink 'B' - Carolees Creations P/Paper, HS Ribbon , sweet pea horizontal & adore, FTI Trimmings Brads, Maya Road 'b', Heidi Grace pin, Blossoms, HS Acrylic Journaling Stamp Adore, Note Paper, Green Journaling Pen By Louise Nelson
I’ve always wanted to a LO inspired by circles, I see them occasionally in the scrapping magazines and I'm always inspired, but don’t actually do anything!!! (lol) I’ve always been mostly a Layout person but with this FA design team position I have been inspired to step outside my comfort zone and create something I wouldn’t ordinarily do.


For the first Circle inspired project I made a simple chipboard circle album held together by a small silver chain, "Family/Friends". I used a variety of Jenni Bowlin papers; with assorted embellishments on one side and then a coloured photo on the other. The theme of the circle album is Family/Friends and includes photos of my 'Adelaide' family/friends. The photos are relatively unadorned, just the occasional Jenni Bowlin [Bird & Branch-Black] rub-on. On the Flip side I used a background of the patterned paper and then included a monogram [Basic Grey undressed mono, mini mono's, Provo Craft Rob and Bob mono's]. Some were already painted and the undressed I painted with Making Memories and Semco Paint, I also used dimensional magic on 1 of the mono's. I then added a simple adornment/embellishment, which included; s.e.i. crochet flower, flowers punched from Jenni bowlin papers, foof-a-la buttons, American Craft and Creative Imaginations Rubons. I used minimal Journaling. ['Can you feel the Love']. I added some Queen & Co. round chipboard letters to smaller decorative tags in-between the photos. Assorted flowers were also used for embellishment including; Imaginence, and Bazzill bitty blossoms. I added some Heidi Swapp ribbons to the chain holding it all together. The smaller tags in-between the photos were covered in Jenni Bowlin Patterned Paper on 1 side and painted on the flipside.
The second project is a Layout called "Face of fun". The photos are of me on Christmas Day 2006 enjoying one of my favourite things - Bubbles [appropriate don’t you think - lol]. The Background is white Bazzill cardstock. I then cut out 2 circles and backed them with a clear circle of overhead transparency. I then adhered the photo to the transparency. I used Patterned paper from Scenic Route to cut and punch out different sizes of circles to accentuate the photos and decorate the page. I painted the undressed chipboard letters to match the patterned paper. And then, because I can’t help myself I had to doodle I used a Zig memory pen to draw around the photos and patterned paper circles. I cut a scalloped edge along both sides of the page, and further decorated this with punched holes and dots of patterned paper.
The third project is really simple Layout, "Smile". The background is black Bazzill cardstock. I then repeated the same technique as the last layout with the clear transparency. On the left side of the photo I applied a white Heidi Swapp Damask sticker and on the right of the photo the Heidi Swapp acetate word title - Smile. I used a white Signo gel pen to outline the page, and large cut-out circle. The fourth project is a Layout, 'Bubble Boys". For this I once again used a black cardstock background. Along the ride side of the page I punched out a line of circles and then backed this with a Jenni Bowlin patterned paper. The rest of the circle design on the page is made up of punched out circles of the same Jenni Bowlin paper and the black cardstock. For the title I painted some undressed monos with cream paint and then outlined them and the punched out circles with the Zig memory pen. The photo is of my godson Philip and his brother Daniel.
I don’t suppose there isn’t anything new to these Layout's, but it gave me a wonderful opportunity to create a layout using some of my fave tools and products; [punches, transparency’s, Jenni Bowlin patterned papers, and anything "OTP"!] :)

By Fran Tynan
Fran created this wonderful little fold out wedding album, from the Bazzill Route 66 Accordian Keeper, with loads of circle embellishments; I think this also continues the wedding theme by reiterating the ring theme. Her second project me today LO shows a creative way to use the Heidi Swapp Foto Folders. The one stamp used inside the circle on the wedding album, looks totally different when stamped across the layers of the layout.

LinkWithin

Related Posts with Thumbnails